Create a New Ontraport Form
If you already have a form you want to use, skip down to the next section. Otherwise, continue below to create your new form…
- Login to Ontraport
- To create a new form in Ontraport, click the Contacts tab
- Click Forms
- Click New Form
- Find the Other Editors section on the page and click Smart Forms
- You can click the First and/or Last Name input fields and click the trash icon to remove these options from your opt-in (we prefer to simply collect the user’s first name and email only)
- Add a name (upper left) Example: “My Main Opt-In Form”
- Click Save
Add GDPR Support (Optional)
If you want to add a checkbox to allow the user to confirm GDPR compliance, then follow these steps…
- If you’re not already there, open the edit screen for your form in Ontraport (go to Contact, click Forms and click your form title to open the form)
- Click the Design tab
- Click Add Field
- Click Create New Field
- In the Contact Information section, click Add Field
- In Field Name, add something like “GDPR Compliant” – we are not lawyers so talk to your legal council for the exact language to use if you’re unsure
- In Field Type, choose checkbox
- Click Save to add the new checkbox field
- Click Save one more time (at the top right) to save your settings – this should then take you back to the form you were editing, but if not, jump back to the edit screen for your main form (Contacts > Forms > click your form title)
- Click the Design tab
- Click Add Field
- Search for your new field “GDPR Compliant” or whatever you called it and click the field name when you find it – this should add the field to your form preview
- Save or click Publish
Set Thank You Page
Your “thank you page” is just the confirmation page new subscribers will land on after they sign up for your list.
- Go to Contact, Forms, click your form
- Click the Settings tab
- In Opt-In Settings, choose “Single” and check the button next to Custom URL
- Add the full URL to your thank you page. If you haven’t created a thank you page yet, go to the back-end of WordPress, go to Pages > Add New and create a new page. We recommend you call it something obvious like “Thanks for signing up to my whatever list” and then Publish the page Once you publish that page, edit the slug by clicking the little Edit button under the page title in the Permalink section and make the slug something simple like “thanks” so that your permalink is http://yoursite.com/thanks. Copy the full permalink for your thank you page and paste it over in the Custom URL field in Ontraport
- Click Save in Ontraport to save your new custom thank you page URL
Create a New Opt-In In WordPress
Tip: Keep Infusionsoft open in one browser tab and open the back-end of your WordPress site in another – this will make it much easier to jump back and forth to complete the remaining steps. Now we’re going to create a new opt-in in the back-end of WordPress that will have two main content tabs for you to complete: content to appear in your popup and your Infusionsoft form info to make it all actually work.
Create Opt-In in WordPress – In WordPress, go to Opt-Ins (left admin menu), click Add New, add a page title
Content Tab – In your new opt-in, find the Content tab and add an image, pre-title, title, sub-title and button text
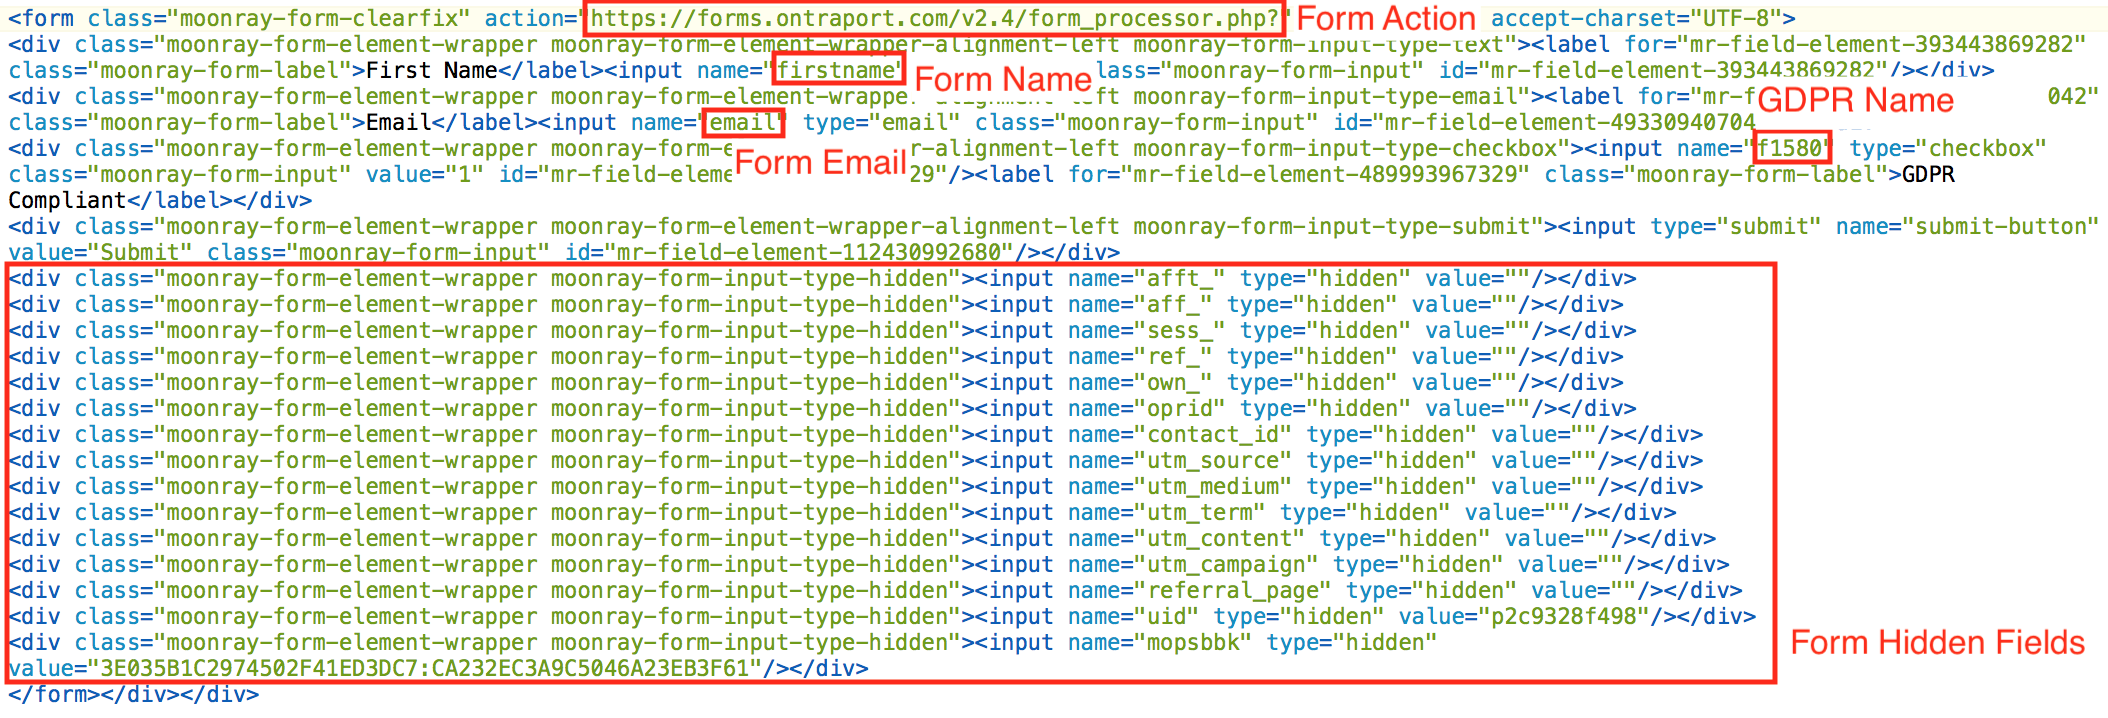
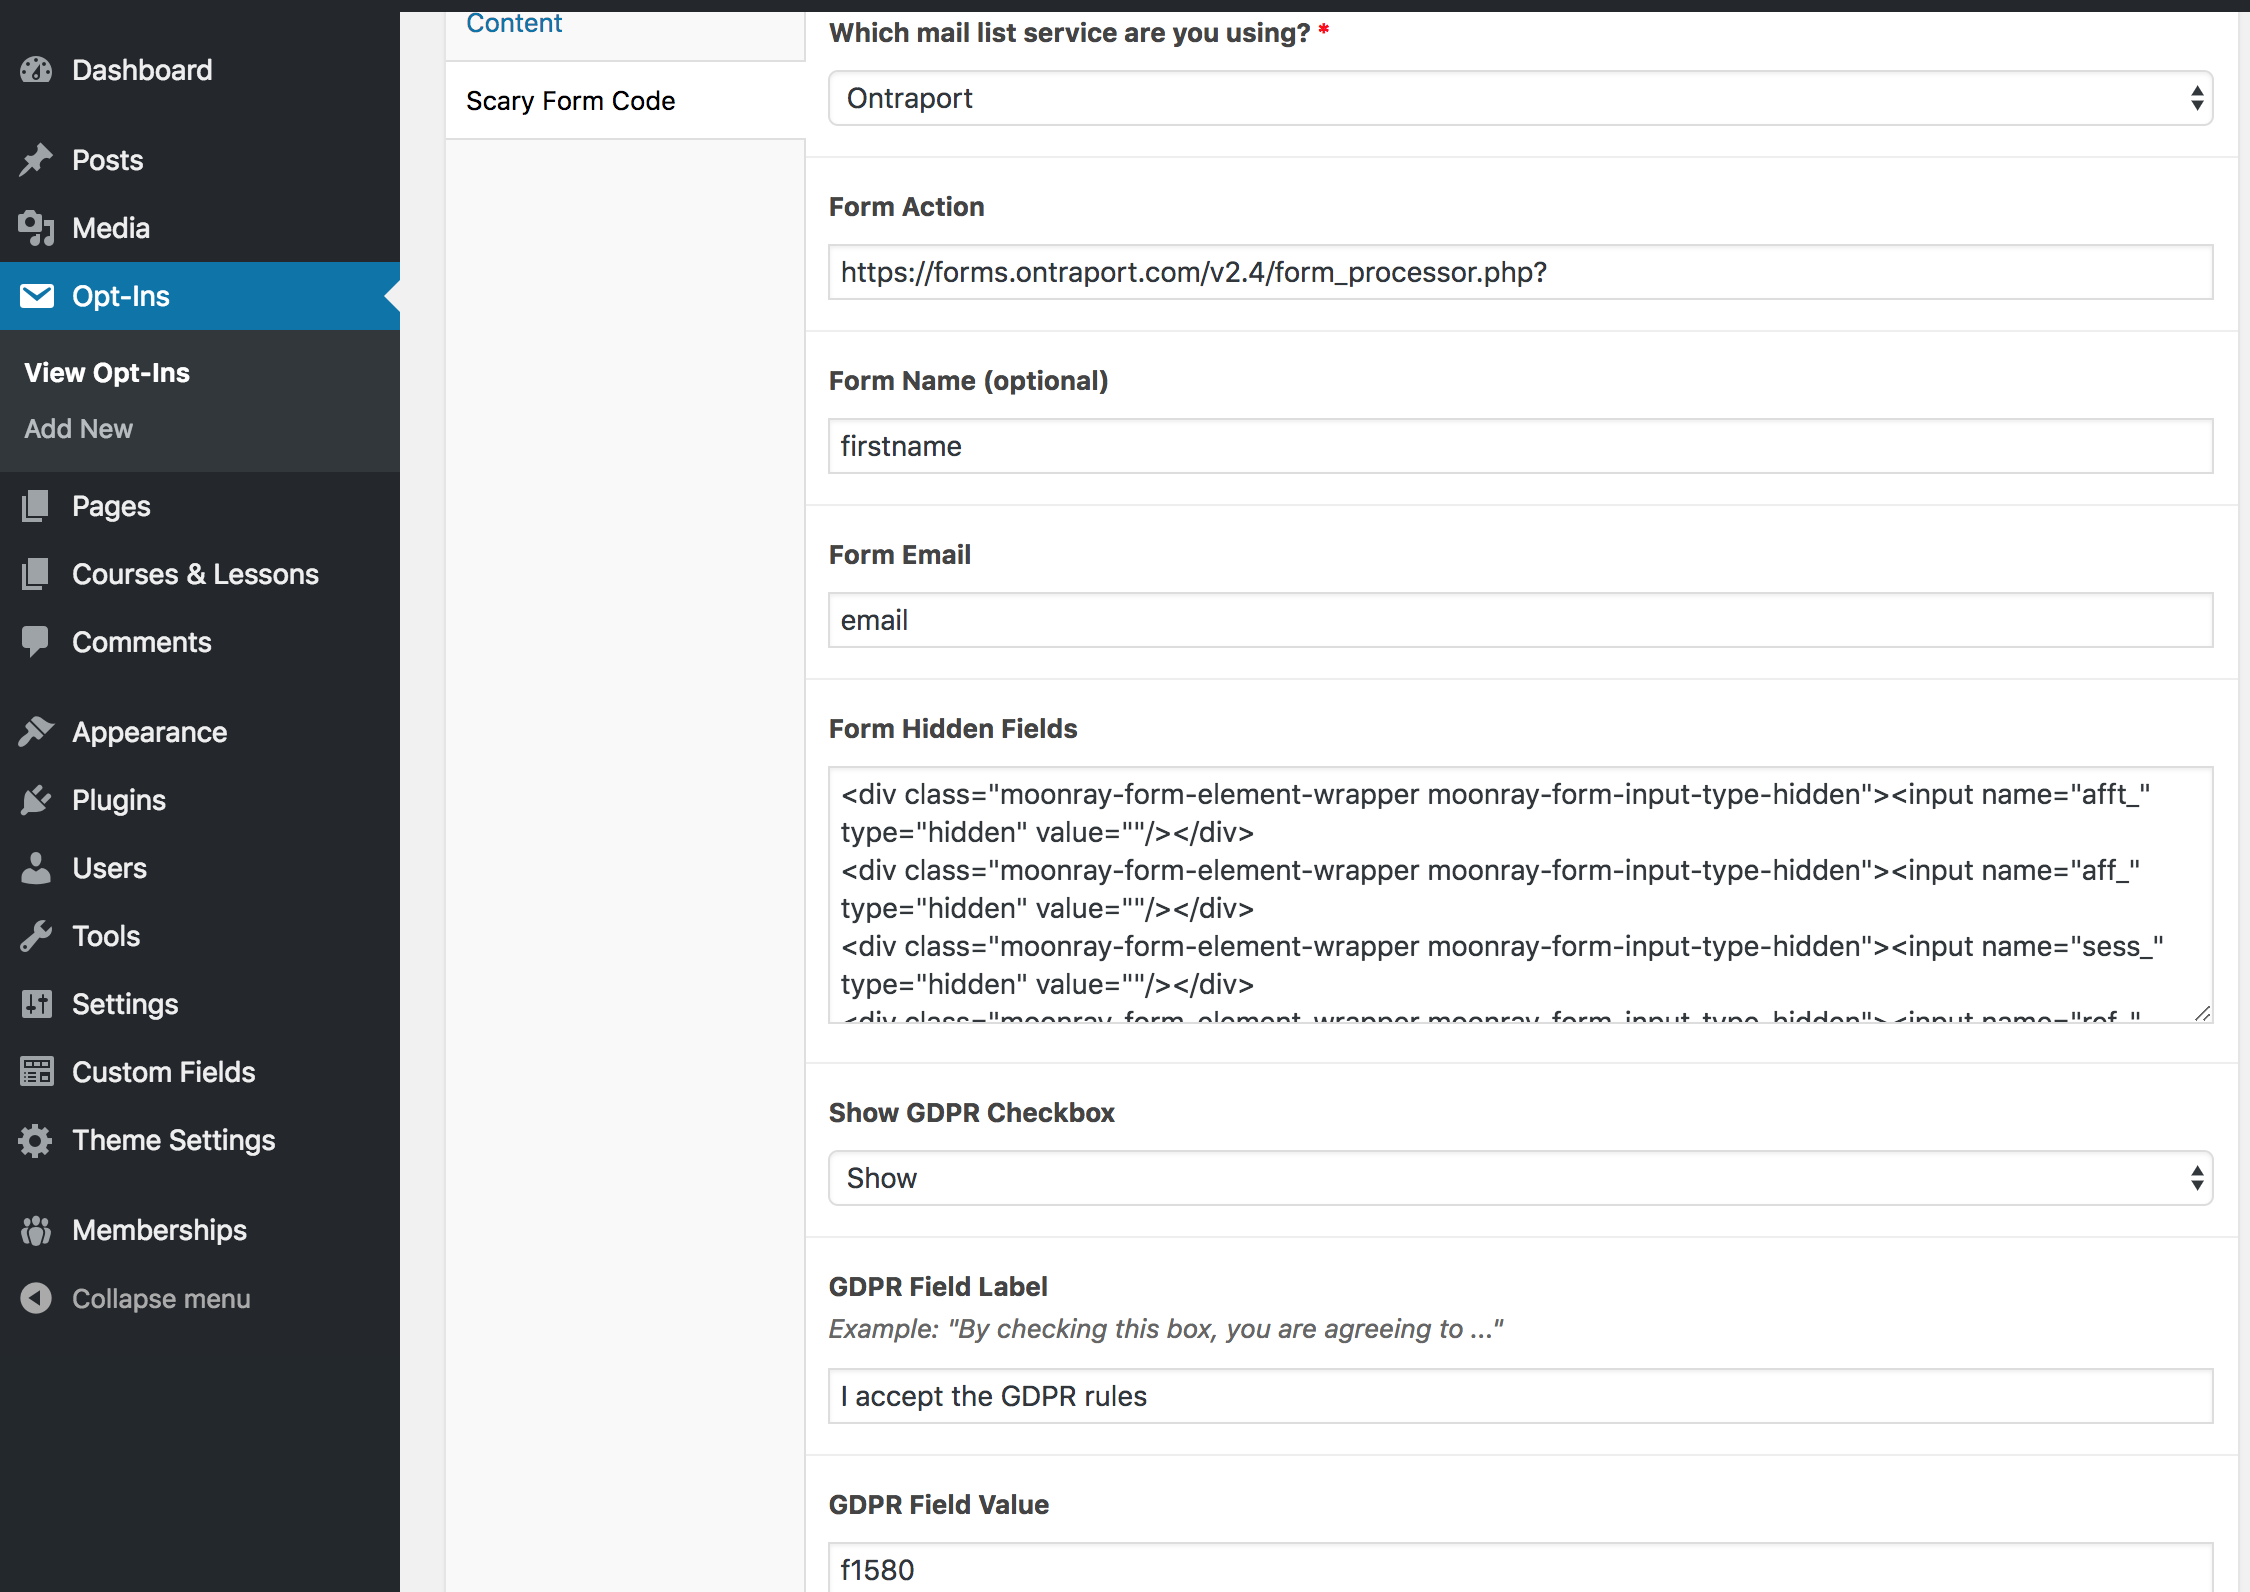
Scary Form Code Tab – It’s really not that scary, we promise. Please follow these steps to get the appropriate info from your Ontraport list and enter it into the fields in the Scary Form Code tab. We’ve also attached two screenshots to give help make it a little easier to see exactly what you’ll want to copy and paste from Ontraport to WordPress.
- In Ontraport, go to Contact
- Click Forms
- Click your form title to open the settings for the form
- Click Publish
- Click the HTML Version tab
- Copy the HTML you see in the gray box
- Paste the code into an empty document on your computer (such as Word, Apple Pages, a Google doc, etc.)
- In WordPress, get back to the Scary Form Code tab for your new opt-in and in these fields, paste the appropriate values for Form Action Code, Form Name Attribute, Form Email Attribute and Form Hidden Fields . Note: We’ve highlighted exactly what you need to copy and paste in the screenshot below
- If you decided to add a GDPR checkbox, then in your HTML code, you’ll also want to find the checkbox attribute name for your GDPR input field and copy what you see in between the double-quotes next to the name attribute. It should look something along the lines of this example: f1580 (see our screenshot below for an example of what this field looks like on our sample form)
- In WordPress in the Scary Form Code tab, find the option to Show GDPR Checkbox and switch this to “Show”
- In the GDPR Field Label, add whatever language you want. Example: By checking this box, I agree to GDPR… (seek your own legal council for exact language to use as we are not in the business of giving out legal recommendations)
- In the GDPR Field Value, add the value you copied just a minute ago (the one that looks something like f1580)
- Save your opt-in